Practically Perfect Tropical Muffins

I don’t make muffins much.  I think I’ve made them 10 or 15 times in my life.  I like muffins a lot actually – to the point where I will seek them out if I hear that a place makes good ones (Mostly Muffins in Colebrook, NH makes some that are spectacular).  But I don’t bother with them.  I find mine to be dry most of the time or the crumb is weird or the texture is just off putting in general or there’s not enough fruit (or too much fruit).  But these muffins, these are a force to be reckoned with.

These are best hot, though I’m the only statement to that fact since I’m the only one that tried them hot.  But the kiwi and mango get almost syrupy when these muffins are fresh from the oven, a jam like fruit texture and an undertone of coconut.  These are indeed tropical, though if you want other fruit go ahead and swap that in a peach in place of the kiwi would be stellar or pineapple for the mango is a genius idea. I love the versatility here – working with a good base is such an important component to baking.  From measuring flour to getting that perfect dome on top; muffins are only as good as their delicious cake-like base.  These muffins have that base.

I wasn’t the only one that adored these muffins though, BF declared them extraordinary and a two year old asked to bring the leftovers home (he also asked for Kaylee but I had to draw the line somewhere).  I also ate like four of these, which is something I never do. Yes I bake a lot and yes I do tend to eat a lot but mostly I foist off my baked goods on BF, co-workers, and other random people that appreciate a good dose of butter.

Practically Perfect Tropical Muffins

Note: These are an original recipe though I used ratios and suggestions from The Best Quick Breads for this recipe.
  • 2 cups flour
  • 1/2 cup finely shredded coconut
  • 1 Tbs baking powder
  • 1/2 tsp baking soda
  • 1/2 tsp salt
  • 1 tsp cinnamon
  • 1/2 cup coconut cream (if you get a can of coconut milk and don’t shake it there will be cream right on top of the water inside – use that)
  • 3/8 cup (6 Tbs) sugar
  • 2 kiwi, chopped into 1/4-1/2 inch dice
  • 1 – 6 oz container greek yogurt (I like Mango Chobani but plain would work too)
  • 2 eggs
  • Preheat the oven to 350
  • Combine the flour, coconut, powder, soda, salt and cinnamon in a medium bowl. Mix until everything is even – the mix will be a light brown (from the cinnamon).
  • In a large bowl whisk the sugar and coconut cream together until fluffy.
  • Add the eggs and yogurt to the creamed sugar/coconut cream mixture.
  • Add the fruit to the liquids and stir to combine.
  • Add the dry ingredients and stir until just mixed – it will be a little chunky.
  • Scoop into a lined and greased muffin pan, fill the muffin liners right up to the top. Makes 12 large muffins
  • Bake the muffins for 25-30 minutes until they are golden brown and a skewer comes out clean.
  • Eat these muffins while still warm, they are best that way.

Cheesy Semolina Bread Fail

Finished Loaf

Not everything I make is a resounding success.  I frequently try recipes and end up throwing them out or pretending they never happened while trying to come up with something better.  This state of mind leaves me one of two ways, I am either sobbing and trying to figure out why I failed or I feel like a totally mediocre cook who can’t do anything right.  Though, sometimes I am trying a new recipe and it just falls flat, like in the case of this bread.  It looks tasty right – the cheese is golden and crispy on top and the whole thing is a lovely golden brown?  It’s not.  It’s dense and chewy and sits in your belly like a bowling ball, just making you feel full but not satisfied in terms of flavor or texture.

Mise En Place for bread

I’ve had semolina flour sitting on my shelf for quite a while now, initially it was there as a pasta making addition but more and more I’ve been coming across semolina breads.  These breads, when I buy them, are fluffy and airy – like a baguette or ciabatta but with a little more texture to the crumb and I am a  fan.  So one day last week I decided to try it out, make my own semolina bread.  So I looked in all of my cookbooks, I looked on the internet – I looked everywhere and found one recipe for semolina bread.  It was a recipe on the King Arthur Flour website and it only called for semolina flour, so I was wary of it but went for it.

First Rise

The dough was a cinch and mixed up in just a few minutes, it rose well, and then rose well after shaping – but in terms of flavor it was flat and disappointing.  Will I try semolina bread again?, of course, I’m nothing if not persistent.  Will I use this recipe again, no.  It needs work – too much semolina flour created a dense bread that weighed heavily and didn’t do either my baking skills or the bread any justice.  I’ll definitely be trying semolina flour again, and maybe then I’ll find a recipe worthy of sharing.  In the meantime – here are some pictures of this bread.

Final Rise


Cinnamon Sugar Pull-Apart Bread

I love to bake yeast breads.  I find the smell of rising bread dough reminds me of being little and making dough with my mom on snowy days.  When we were growing up we always made the same bread – a standard white bread recipe that always made six loaves.  We would make the dough and I would stand on a chair to turn the handle of the dough kneader – a big steel bucket with a dough hook that we turned with a worn wooden handle.  Now when I make dough I use the dough hook attachment for my Kitchen Aid and it takes two or three minutes, it’s quick and does a great job – but I still kind of miss turning that big crank to watch the dough turn into a perfect ball.

This bread is not from the recipe I used as a child – it’s a sweet dough, so there’s sugar there and some spices too.  This is a recipe that Elly used in my high school baking class to teach students about yeast risen dough.  It’s rich in all the right ways and makes a perfect loaf of pull-apart bread.  I’ve mentioned Elly on here in passing a couple of times, she gave me the best recipe for Ginger Snaps I’ve ever tried and she is one of the reasons I still cook.  I remember her coming to school suppers and serving baked beans when I was little and staying until the very end of the meal – making sure everything was put away and the kitchen was spotless.  She was a woman who cooked because she loved to do it, not because it was a chore or something her family needed – sugar and butter were her lifeblood.

Every year when she showed her intro baking classes this recipe she talked about getting up at four in the morning to bake perfect cinnamon buns for her kids and husband because it was the best smell to wake up to.  She’s right, it is the best wake-up smell.  I make this bread every other month or so for BF and I, and even though I don’t get up at four in the morning to have the bread ready by 6:30 I understand her meaning.  That magical scent of cinnamon, sugar, and butter baking in the oven always makes me happy to be awake.  And I know I say this often – but there’s nothing more satisfying on a lazy weekend morning than kneading bread dough and playing with yeast.  It takes a bit of time to bake a yeast risen dough, but the payoff is totally worth it. I promise.

Cinnamon Sugar Pull-Apart Bread
Adapted from my introduction to baking cookbook where it is written in purple, sparkly pen.


For the Bread:
1 cup warm water
1 Tbs yeast
1/4 cup sugar
2 Tbs butter, melted
1 tsp vanilla
1 tsp salt
2 1/2-3 cups all-purpose flour
1 tsp cinnamon

For the filling:
4 Tbs butter, melted
1/4 cup sugar
2 Tbs cinnamon

Combine the water, yeast, sugar, and butter in the bowl of a stand mixer fitted with the dough hook attachment and allow the mixture to get a little frothy.
Stir in the vanilla and the salt.
Add 2 cups of flour and combine, on low, with the dough hook.  Continue to add flour in 1/4 cup increments until the dough comes together as a ball.
Continue to stir the dough with the dough hook for another two minutes.
Place the dough in a lightly oiled, large bowl covered in plastic wrap.  Put it somewhere warm to rise until doubled in volume, about an hour.
When the dough has risen dump it out onto a lightly floured surface and roll it out until it’s a rectangle about 9″x15″.
Lightly grease a loaf pan with butter.
Combine the melted butter, sugar, and cinnamon so they become a paste – I’ve spread the butter then used cinnamon sugar as well, but prefer the paste method.
Spread paste evenly over the rolled out dough.
Cut the dough into strips about 3″ wide.  Stack them on top of each other. There should be about five.
Cut the stack of dough strips into thirds.
 Stack the cut dough in the loaf pan so that the cinnamon side of the dough is touching the non-cinnamon side.
Cover the pan with plastic wrap again and let it rise somewhere warm.
While your dough is rising, preheat the oven to 350 degrees.
When the loaf is ready, about 30 minutes later – it doesn’t need to double this time, we were just letting the flour relax a bit – pop it in your preheated oven.
Bake the bread for 30-35 minutes, until it’s golden brown on the top.
Allow it to sit at room temperature for 5-10 minutes before eating.
This is ideal with a cup of coffee.
Share with a friend.

Yeast Risen Pumpkin Bread

Photo taken by Rachel Leah Blumenthal of Fork it Over, Boston and Boston Food Bloggers

There are some days that are just plain nasty.  It’s cold outside, or rainy, and all you really want to do is stay in, huddle up to a toasty oven and bake while reading a good book.  As fall sets in I am encountering more and more of those days.  Days where the rain outside makes everything gray and the world seems like it would be much more appealing in my warm and cozy, down comforter covered bed with a good book.  As I am home more on rainy days trying to come up with creative ways to spend my time that don’t involve replaying Diablo 2 (which is AMAZING) I head for the oven and my baking bibles – Flour, Boston Cooking School, the internet – whatever strikes my fancy and I bake a lot, usually more baking than BF and I can eat on our own, happens in the colder weather.  It’s an obsession, also – I tend to bake so I don’t have to turn up the heat!

This pumpkin bread was baked on one of those gross, rainy autumn days that kept me tied to my apartment and fidgety.  BF had been asking me to make monkey bread so I went to the pantry hunting for a recipe (really the only recipe I use, the one from Smitten Kitchen) but it was a white monkey bread, I wanted mine to be pumpkin – so I did what I always do when I don’t have a recipe for something, I called my mom.  After a discussion on the rain, yes it was raining in Maine and Boston (such craziness!) I got around to my question; can I sub in pumpkin for a liquid in bread or did she have a yeast bread recipe with pumpkin?  She paused, reprimanded my little brother and then proceeded to consult her wall of cookbooks.  As Mom searched her cookbooks I searched the net – to no joy, seriously the internet makes me a sad panda sometimes.  Mom however, was victorious – nestled in the pages of the King Arthur Flour 200th Anniversary Cookbook was a recipe for yeast risen pumpkin bread, what joy!  I flipped over the monkey bread recipe and wrote down ingredients and steps.  I was ready.

So I measured, mixed, kneaded, waited, shaped, waited, baked and ate.  Making yeast risen bread is one of my favorite activities and on a rainy day it was perfect.  And this bread?  I made it three ways – as a cinnamon roll (which I sent to work with BF), a plain loaf of pumpkin bread, and monkey bread (of course).  I think the cinnamon raisin bread was the best usage of the dough and next time I will not try to make it stretch so far.  The monkey bread was dense and over cooked 🙁 and  the plain loaf lacked the oomph I was looking for.  But the cinnamon-raisin bread?  it was bread gold; rich and sweet without being cloying.  It was decadent and totally fantastic.

Yeast Risen Pumpkin Bread
Adapted via Mommy from the King Arthur Flour 200th Anniversary Cookbook
Note: This makes two full loaves, don’t try to stretch it into three unless you’re making mini loaves anyway.  I adapted this recipe a little bit out of necessity because I realized I only had one egg, so this is mine after the one egg change.

For the Bread Dough
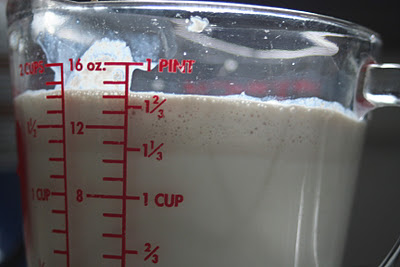
1 1/2 cup milk, at 110 degrees (should be just warm to the touch)
1 Tbs sugar
2 Tbs yeast
1 Egg
1/4 cup butter, softened
1/2 cup brown sugar
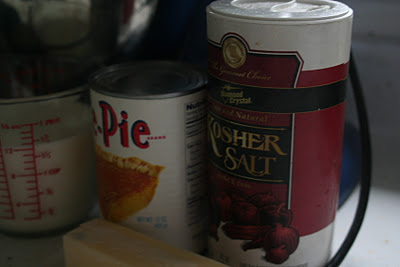
1 1/4 cup pumpkin puree (I always use One Pie, made in Maine of Maine pumpkins 🙂
2 tsp cinnamon
1 tsp nutmeg
2 cups all purpose (AP) flour
1 Tbs salt
3 1/2 – 4 1/2 cups AP flour

For the Cinnamon raisin swirl
1/4 cup butter melted
1/2 cup brown sugar
1 tsp cinnamon
1/2-1 cup raisins

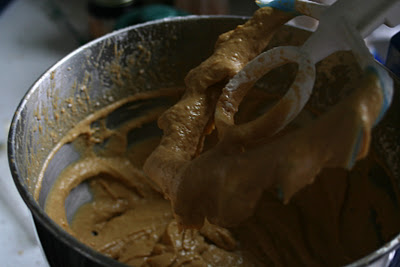
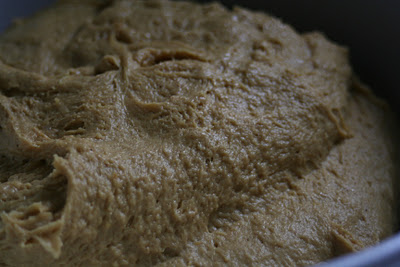
In a large bowl combine the milk, yeast, and sugar and allow it to get bubbly (2-3 mins).  Add the egg, butter, brown sugar, pumpkin, cinnamon, and nutmeg and mix until everything is fully incorporated and smooth.  Add the 2 cups of flour and salt to the liquid mixture.  It should look like a thick brownie batter at this point (but orangey as opposed to dark chocolatey).  Add the additional flour 1/4 cup at a time until the dough is no longer sticky and is in a nice dough ball.  Knead this dough ball for 3-4 minutes – until it is smooth and elastic. Allow the dough to rest for 3-4 minutes then briefly knead it again.  Put the fully kneaded dough into a large, clean, oiled bowl, cover it with either plastic wrap or a bread towel (one with no terry on it), and let it rise until doubled in volume.  This takes about two hours.  Maybe you should go watch a movie?  And since it’s October I will suggest Zombieland, because it’s fun.

After your dough has risen go ahead and punch it down, you know you want to.  Turn out the dough onto a lightly floured countertop and split it into two halves with a sharp knife (or counter scraper if yours is sharp like mine).  Move one half of the dough over to the side.  Roll the second half of the dough out until it’s about 9″ wide (this should be the height of your bread pan) and 15″ long.  Using a pastry brush, spread half of the melted butter onto the rolled out dough.  Sprinkle the melted butter with half of the brown sugar, cinnamon, and raisins.  Starting on the 9″ edge roll the dough up.  Tuck in the ends and place the loaf in a well greased pan with the seam side down.  Repeat with the second loaf of bread.  Cover the shaped loaves and let them rise a second time, this time for just half an hour or so to let the gluten calm down.

Place the bread loaves in a cold oven preheating to 400 degrees Fahrenheit, cook for 15 mins.  Turn down the temp to 375 and leave the loaves for 20 mins.  The loaves will be a nice golden brown when done.  When the bread is still hot rub butter over the top, this will keep the bread from getting too hard and dry and it will also infuse it with butter, which is AWESOME.  Eat this bread as breakfast or a late night snack, maybe with some Doves and Figs jam?

Rosemary and Olive-Oil Focaccia

Have you ever planned a perfect meal and gotten all of the ingredients only to realize at the last minute that you forgot something crucial?  Have you ever decided to forgo your whole meal because you forgot that thing, or worse go without?  I have.  And everytime I feel that way I yearn for the thing I had planned for.  This happened to me recently with a darling friend when she came to Boston for a day of cooking, visiting, and drinking (we made the most magnificaent mimosas which I will share soon).  As we wandered through H-Mart looking at quirky and adorable bowls and spoons I offhandedly mentioned my lack of eating much tofu in my life.  My formerly vegan friend immediately demanded we get tofu, coat it in nutritional yeast and make sandwiches with it.  I said fine and she went on a tofu and nutritional yeast hunt.  Do you know how hard it is to find nutrional yeast?  The only place I found it was Whole Foods on River St, seriously, why so anti-vegan?

We arrived home laden with bags of H-Mart shopping, China Fair (a kitchen supply store in Newton) shopping, and some groceries from Star Market.  But we had forgotten bread for our sandwiches.  We cursed our lack of wherewithal and I said that I would make some, since I had all the ingredients and I do so love to make bread.  Also we were done with the being out part of the day and just wanted to cook and in general make a big kitchen mess.

I pulled out my Flour cookbook and turned immediately to the Rosemary and Olive-Oil Focaccia recipe.  I bought this book at the end of April and I have already made this focaccia dough a handful of times (like 4) for pizza.  It is the perfect recipe for pizza dough with its soft airiness, and as a foccacia it was DREAMY.  I loved sandwiches on it, good thing too as I wasn’t such a fan of the nutritional yeast coated tofu (sorry, S – maybe if we had fried it up in some butter I would have liked it more).  We made our sandwiches with tofu and there was still half a loaf of bread, ooh excitement.  I saved it, squirrelled away in a big ziploc in the pantry and the next day made the most heavenly prosciutto sandwiches on that bread.  Who knew?

Please take the time to make this dough – you won’t be sorry and your dining companions will thank you.  Focaccia is a nice way to “swank” up those humdrum sandwiches you’ve been carting to work and it’s totally flexible; next time I’m going to stud it with sundried tomatoes and top it with some fresh grated asiago.  Swoon.

Rosemary and Olive Oil Focaccia
Barely adapted from the Flour cookbook by Joanne Chang, it’s practically perfect as is, and mine wouldn’t be at all adapted if I kept bread flour around.

1 3/4 cup warm water (about 110 degrees)
1 tsp active dry yeast
3 1/2 cup All Purpose flour
1 1/4 cup bread flour (this is my only modification, I don’t keep bread flour around so I used AP, it was wonderful)
3 tsp kosher salt
2 Tbs sugar
3/4 cup olive oil
Cornmeal
2 Tbs Rosemary, roughly chopped

Combine the water and yeast together and allow the yeast to get foamy (about a minute of sitting).  If your yeast does not foam and just sits at the bottom of the water try again with slightly warmer water, if your yest still isn’t foamy it’s dead and you need new.  Once your yeast is activated and happy pour it into the bowl of a stand mixer fitted with the dough hook.  Add the flours (if you are using both, if not then just use 4 3/4 cup of AP flour), 1 tsp of the salt, and sugar and turn the mixer on low, allowing the dough hook to bring the whole thing together.  When the dough is a shaggy ball drizzle 1/2 cup of the olive oil into the bowl.  Continue to knead the dough until it is a smooth ball – 4-5 minutes on a low speed.  When the dough is smooth and supple turn the dough ball into an oiled smooth bowl.  Cover the bowl with a lightly oiled piece of plastic wrap and let it rise somewhere war (70-80 degrees) until doubled in volume.  Once the dough is risen you can do two things with it: either, split it in half and make two pizzas (NOMNOM) or make focaccia bread.  To make the focaccia bread turn out the dough onto a 10″x15″ cookie sheet spread with cornmeal.  Stretch the dough until it fills the cookie sheet and pock mark it with your fingertips.  Brush the top of the focaccia dough with the 1/4 cup of olive oil and sprinkle the salt and rosemary on top.  Bake the focaccia at 425 degrees farenheit for 30-40 minutes, until golden brown and puffed.  Eat this focaccia as sandwich bread, it’s one of the best things you will ever do.