BF’s Nintendo Cake

So, Nov 20th was BF’s 27th birthday.  Not a significant birthday really – it’s not a milestone or anything, but this year is a special one for him.  He’s accomplished a lot and this past year has taught him how to be stronger and patient with all aspects of his life so I wanted to celebrate it.  As a gift he got (or rather is getting because it’s still not here) the 25th anniversary edition of Zelda: Skyward Sword, so I decided his birthday cake should be Nintendo-themed.  I started to plan this cake in March;  It’s a classic Nintendo Entertainment System, for those not in the know, and it has his favorite Zelda game in the cartridge slot, The Legend of Zelda, which is also the first Zelda game.

I made the cake of Brown-Butter Rice Krispie Treats and a family carrot cake recipe that I always make him.  I purchased the fondant; its just the Wilton brand because I wasn’t sure how to make it and didn’t want to mess up BF’s birthday cake for my first test.  But now that I have worked with fondant, (a first!) I will probably do it again, and may even try making it myself, maybe with marshmallows next time.  We’ll see.  Below is my photo step-by-step of the whole process from start to finish.

From start to finish creating this cake was a lot of fun, but next time I think I’ll try to make it on a day other than BF’s actual birthday.  It was a lot of work and took a fair amount of time because I just wasn’t prepared for how hard it was going to be to work with the fondant and keep the cake a surprise.  Also, banning BF from the kitchen for his entire birthday was kind of mean; he wasn’t able to come in and get snacks or anything.  Thankfully two of his best friends were visiting, so they played Settlers of Catan while I finalized cake sculpture.

[Editor’s Note: The game “cartridge” was removable as well; instead of blowing out candles, I blew into the edible game cart in hopes that would get the system to start. And for the record, I do not recommend eating game controllers, no matter how vintage they may be. All in all, truly outrageous.]

Fudgy Brownies with a Swirl

So, here’s the thing.  I love these brownies and I tend to swirl them with whatever I have on hand – Biscoff spread, ooey-gooey caramel, peanut butter, sea-salt flakes – basically anything that will lend itself to chocolate.  I am partial to the swirl of Biscoff spread – it’s a little bit cinnamony and a whole lot of tasty that makes the chocolate much less decadent and totally sinful.  I found these brownies before I even started blogging and immediately made them to BF’s groans of general brownie dislike.

The crux of a good brownie, I have taken to thinking, is that it must contain some sort of balance and MUST MUST MUST have mad quantities of butter inside.  They should also be an soft brownie, one specifically designed to be fudgy and dense – but still fully cooked.  These are that magical brownie that falls between overly rich and heavy and cake.  They are moist and addictive.

That first batch of brownies was plain, with a sprinkle of Maldon flaky sea salt.  Brownie batch number 2 was a swirl of peanut butter and a sprinkle of sea salt.  Batch number 3 was a swirl of Biscoff and batch number 4 had a caramel swirl.  All of the brownies had their pros and cons – salty lovely caramel, creamy lush Biscoff, peanut butter, and the simplicity of a well chosen salt.  These would probably also lend themselves to a swirl of Nutella if that’s your thing.

Regardless, you should probably make these brownies, for yourself or just to give to a friend who needs some cheering – as long as they like chocolate!

Fudgy Brownies with a Swirl
Adapted from Bake or Break (I think, this recipe has been floating around my apt for a while).  I have modified the recipe so use more unsweetened baking chocolate (because I have an excess) and I cook mine a little more than she suggests.  I have added directions to swirl ingredients in but I will leave it up to your discretion as to what that swirl you choose, if any.

10 Tbs unsalted butter
3 ounces unsweetened chocolate
1/4 cup unsweetened cocoa powder (dutch processed will be richest)
2 cups granulated sugar
3 large eggs
1 1/2 tsp vanilla
1 cup all purpose flour
1/4 cup peanut butter, biscoff spread, caramel sauce, dulce de leche (whatever)
1/2 tsp sea-salt

Preheat an oven to 350  degrees.  Grease and flour a 9″ round or square pan, if you want to get really fancy you can line it with parchment paper (a tutorial can be found here).  In a small-ish (microwave-safe) bowl, or in a double boiler, melt the unsweetened chocolate and butter together until well blended, about 45 seconds in the microwave stirring every 15 secs or so.  Allow the chocolate/butter mixture to cool slightly.  One at a time add cocoa powder, sugar, eggs, vanilla, and flour – making sure to fully incorporate each ingredient before moving to the next.  Pour the batter in to the prepared pan.  If you are adding a swirl to your brownies you will do that now, drop tablespoonfuls of your swirl (Peanut butter, biscoff etc) into the pan strategically and gently swirl them in with a knife making sure to not get too close to the edges of the pan or scrape the bottom.      Sprinkle the salt onto the top of the swirled batter.  Bake for 30-40 mins, until the edges are set and the middle is set (but not necessarily firm), at this point a toothpick inserted into the center will come out with a bit of batter (though it shouldn’t be much).  Cool the brownies at room temp for 20-30 mins, I like these brownies when they’re warm from the oven but if you want it less gooey stick it in the fridge.  The brownies will still be rich, but less messy.  These go fast, especially if you like brownies.

Bananas Foster

So.  Here’s the thing about bananas foster, I hadn’t had it until just recently when Brian blogged about it.  His blog was full of fond memories of flambe-ing in the new year with bananas foster and family.  Touching and pretty much the best idea of how to bring in a new year ever, fire and sweets – yes please.  I got all the stuff and made it for BF and I to ring in the new year, that first time I messed it up, my sugar crystallized because I heated it up too quickly and it separated a little bit from the butter, but it was tasty and the fire was mighty attractive :).

So I tried it again, when a friend came over for dinner later in January, and again when my big sister was living with me.  It was a simple and fast dessert, something that tasted like it was a lot of work but wasn’t and it took at max 10 minutes to come together in a magical and oh-so-satisfying buttery way.

Recently, my sister came over for dinner on a night when we were supposed to go out, we got lazy and decided youtube videos were a much more entertaining prospect than dinner somewhere we couldn’t be loud and ridiculous.  So I did what any sensible person with a pretty bare fridge would do, I ran up the street to Arax for some dinner essentials; cauliflower, red pepper and pasta quick easy dinner fixings.  As I was getting ready to leave the store, and lamenting that I had missed the black figs they had on sale, one of the owners asked me if I could use some overripe bananas.  I said sure, thinking that I could make banana bread or a banana smoothie.  He handed me 14 bananas.  Not only was going to make banana bread and a banana smoothie but the strawberries I had just purchased for dessert were going in the fridge and bananas foster was dessert.  I went to the liquor store and got some nice dark rum and headed home.

When my big sister got there for dinner we ate – pasta with cauliflower and asiago.  Then we (she, BF and I) watched the Old Spice you tube videos with Fabio and Old Spice Guy (for the record, I’m in the Fabio camp here).  We giggled a lot and then I suggested we make dessert.  Big Sis perked up and asked what I was making, I told her and walked into the kitchen.  She followed begging me for the recipe.  I handed her my camera and told her that I would blog it if she would take pictures of the process.  Done.  So here it is – Bananas Foster with my big sister’s blessing and BF’s whole hearted approval.

Bananas Foster
Adapted from My Food Thoughts
Note:  Be careful as this is addictive, it can serve four people but two will polish it off just as easily.

1 stick butter, unsalted
1/2 cup dark brown sugar (I prefer the stronger flavor of the dk but light is fine if you want it less caramelly)
1/2-1 tsp ground cinnamon (optional)
4-5 ripe bananas, peeled and cut into managable pieces, I like sixths
1/4 cup rum (I used Kraken, because it’s got an octopus on the bottle)
vanilla ice cream or greek yogurt (for serving)

In a wide skillet melt the butter over medium heat.  Once the butter is melted add the brown sugar and cinnamon, stir well.  I find it’s best to sort of spread the brown sugar around the pan in a sprinkle as opposed to adding it in a lump to the middle, that will make it not blend with the butter.  Once the brown sugar and butter are incorporated add the banana pieces.  Cook one side of the bananas for about one minute then flip them and cook the other side.  They will be a nice caramel color.  Have a second person in the kitchen turn out the lights, for dramatic effect.  Add the rum.  Light it on fire.  Watch the rum burn off in pretty blues and oranges, be careful to keep anything flammable (like yourself) well away at this point.  Turn the lights back on.    Add a scoop of vanilla ice cream or plain greek yogurt to a bowl.  Scoop as much of the bananas foster onto it as you can eat.  Eat it all.  Then sneak back into the kitchen for seconds.  or thirds. I won’t tell.  I promise.

Mini Oreo Cheesecakes

Mmm cheesecake.  It’s creamy, it’s sweet without being cloying, and it’s delicious.  Always.  So when a friend came to work lamenting the “oreo cheesecake” she had gotten at Mike’s, saying that it was merely chocolate cake with some wierd creamcheese filling, I started plotting these little delights.  She lamented the Mike’s cheesecake in August or so and I made her these in November; enough time for her to totally forget about that disappointment 🙂

Ingredients

My first challenge for these was to determine just what exactly I was going to do for the cupcakes and as Twitter was alive with Joanne Chang’s Flour cookbook and it seemed to be THE cookbook everyone was using. I determined that I needed to make her oreos.  So I found the recipe on Boston.com thanks to Joanne Chang herself directing me to it (super thanks!).  And started plotting.  I had a vision of cheesecake with a full oreo base, until I realized that making all those oreos was just way more work than I was willing to put in ;P
So I just made the cookies, sans filling, and put them in my mini-cheesecake pan as crust.  They were delicious, and will definately be made this way again!

The cheesecake was a breeze, after a quick phone call to my mom (the bible of all cooking questions and head-full of random and mostly useful information), I had a cheesecake recipe that worked with what I had in my pantry/fridge.  I was giddy.  I started cooking on Sunday around 1pm.  I finished cooking around 8pm.  I was exhausted, but it was worth it.  Homemade Oreos, dark chocolate cheesecake, vanilla cheesecake, dark chocolate cheesecake.  Delicious.  And perfect.  My coworkers certainly thought so!

Oreo Cheesecake
Note: I’ve made a lot of cheesecake.  This one is very simple.  Try it.  If you want to make a full-sized cheesecake follow all of the directions below but replace the oreo cookie with a cookie crumb crust and  bake the cakes for an additional 10-15 minutes.  Also, I used the Flour recipe for my oreo cookies in the bottom of the cheesecake.  I baked the cookies according to the recipe, did not fill them, then cut them to size and dropped them into my mini spring-form pan.

1/2 cup semisweet chocolate chips, melted
1/2 cup sugar
1-8oz pkg cream cheese, full-fat, softened to room temp
1 1/2 cup Greek yogurt or sour cream, separated
2 eggs
1 tsp vanilla
2 tbs brown sugar

Preheat the oven to 325 Fahrenheit.  Melt the chocolate chips over low heat.  Beat the cream cheese and sugar together until creamy.  Add 1/2 cup of the Greek yogurt or sour cream and the eggs to the cream cheese-sugar mixture.  Beat this until smooth.  Pour 1/3 of the cheesecake batter into another bowl and add the vanilla to this bowl.  Mix well.  Add the melted chocolate to the larger quantity of cheesecake batter (roughly 2/3 of the whole batter).  Mix well.  In a mini-spring-form pan (or a cupcake tin lined with paper cups) drop the cheesecake batter over the homemade oreo cookies, alternating chocolate-vanilla-chocolate for an oreo look. Pouring your batter gently over the back of a spoon (to disperse it, like making a layered cocktail) will keep the layers from blending together.  Put the cheesecakes in the oven.  While the cheesecakes cook, combine the rest of the yogurt/sour cream (1 cup) and the 2 tbs of brown sugar to make a glaze. Remove the cheesecake from the oven (about 10 minutes into baking) and glaze them with the yogurt/brown sugar mixture.  Return the cheesecakes to the oven for another 15-20 minutes, until they are light golden brown.  Remove the cakes from the oven and allow them to cool completely; overnight or at least 6 hrs is ideal.  Serve them to someone who loves sweets, they’ll be over the moon about them.  I swear it.

Nesting Spice Cookies

I love gingersnaps.  I love the crackly sugar coating and the way it yields to a cookie that is sharp and spicy.  I love the depth of ginger, molasses, cinnamon, and clove when they get together for a party.  I love the crunchy snap of the cookie as it crumbles onto my tongue. I am obsessed.  So when I saw this King Arthur Flour blog post about nesting cookies, my thoughts went to spice cookies and all I needed was a reason to make them, which was conveniently delivered in the from of a Merchant Marine friend stuck in Florida and another friend nursing a cold in Minnesota.

These gingersnaps are my thought of a perfect cookie and I have never found their equivilent.  These are the same recipe we used in my high school culinary class.  We used to sell cookies around the school every other Friday and there was one teacher who requested a bag of a dozen every time; how could we say no to that?

The snickerdoodles are also divine; I don’t have the passion for them that I have for the gingersnaps but how can you not love a cookie that is rolled in cinnamon sugar?  More crackle!  More soft yielding sugar!  More cookie perfection!  I used Smitten Kitchen’s recipe for snickerdoodles, so you can just go over there and snag it if you want to make these; I totally recommend it. 

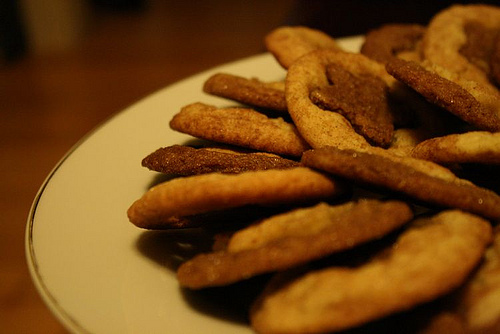
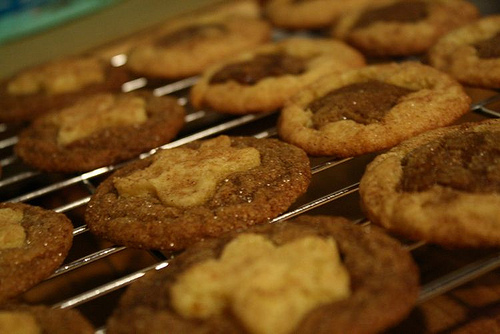
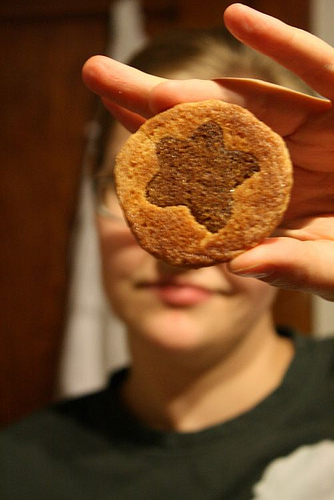
These nesting cookies will become your favorite cookie the way they became mine. The instant the pans were cooled, the sharp gingersnap married so well with the neutral snickerdoodle that the whole cookie experience became transcendental.  My sister couldn’t keep her hands off of them!  As I tried them for the first time, I said (to the general apartment), “Frack, I’ve found my favorite cookie and it takes twice as much work as any other cookie!”  I then proceeded to eat two more of them before remembering I was giving them away, hem-hem.

These cookies were visually stunning, with the warm gingersnap color and the bright snickerdoodle.  Now if I could just find a way to foist off more of them on people I know. Anyone need a care package?

Nesting Spice Cookies
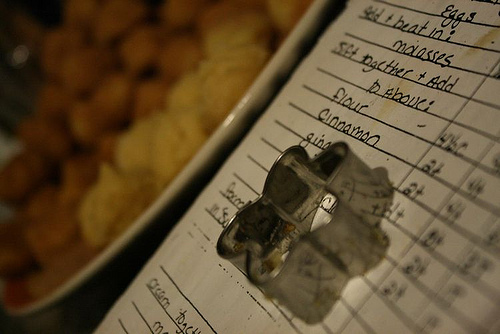
Based on an idea I read about on the King Arthur Flour Blog
These Crinkly Molasses Cookies are from my Introduction to Baking book from high school (which still has safety sheets for the Hobart in it. Ah love).
The snickerdoodles are from Smitten Kitchen, I add an additional tsp of cinnamon to the dough when making it as well as dipping the cookies in cinnamon sugar.

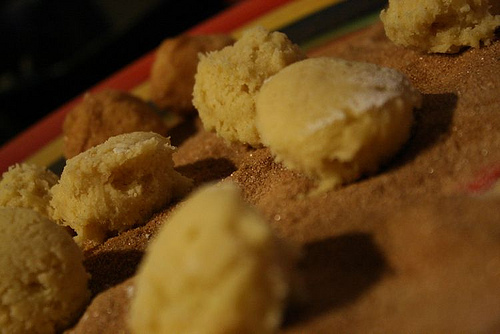
The most important thing to note for these cookies is to make sure they are of a consistent size; use the same cookie scoop for both sets of dough (or at least matching scoops).  Also make sure the cookie cutter is metal and sharp (the cookies will be very hot, so plastic will not work so well).

Ellie’s Crinkly Molasses Cookies
Makes about 3 doz large cookies (about 3 inches across) and 6 doz small cookies (about 2 inches across).
1 1/2 cups softened unsalted butter
1 cup sugar
3 eggs
1/2 cup molasses
4 1/2 cups all purpose flour
2 tsp ground cinnamon
1 tsp ground ginger
1 tsp ground cloves
4 tsp baking soda
1/2 cup demrera (raw) sugar (recommended but regular sugar works too)

Preheat the oven to 350 degrees farenheit.  Cream the butter and sugar together with a flat paddle in a stand mixer over med speed or with a hand mixer at medium speed.  Add the eggs and mix to combine.  Add the molasses and mix evenly (my trick:  put a little canola oil in the measuring cup and let it cover the whole inner surface. Then add your molasses. The molasses will slide right out and it won’t be so hard to clean!).  Measure half of the flour, the spices, and baking soda into a sifter and sift them together into the bowl.  Sift the second half of the flour into the bowl.  Mix the dry ingredients in until evenly incorporated, the dough will be a lovely nutty brown.  Put the demrera sugar in a pie plate, allowing it to evenly coat the bottom.  Using a standard cookie scoop (I like 1 1/2 Tbs), scoop the dough out of the bowl into same size balls and drop them into the sugar, coating them completely.  Bake the cookies on a parchment lined baking sheet for 8 mins for smaller cookies, and 12 mins for larger ones.

If you want to make nesting cookies (like mine, sooooo pretty and fun):
Make a second batch of cookies that are a different color, I recommend these ones from Smitten Kitchen.
Cook 2 trays of equal amounts of cookies at the same time (I liked to do 8 on each sheet) and pull them out of the oven about a minute before they are done.  Using a metal cookie cutter, cut your desired shape out of the middle of each type of cookie, swapping centers to create a nested effect.  Return the cookies to the oven for another minute so the centers set.  Delicious.  Send/give them to a friend in need of a pick-me-up they will appreciate it.