Browned Butter Rice Krispy Treats

RiceKrispytreat1
I have a confession: I love rice krispy treats. I love them in an unabashed I will gorge myself silly on them if they are in the house kind of way.  I love them in a “these are made with breakfast cereal so they totally count for breakfast” kind of way.
RiceKrispytreat2
I’ve been making these little snacks for at least three years, every six months or so I get a hankering and cook up a batch.  It takes ten minutes at the most and you get to have a super classy and delicious dessert/snack/breakfast at the end.  I made these ones with my sister and she took all the pictures for me, I also made her some salted caramel sauce that same night so we got creative with the drizzling.
RiceKrispytreat3
Now go grab the ingredients and make these.  They’ll cost you less than $3 and they disappear within twenty four hours. I promise.

Browned Butter Rice Krispy Treats
This recipe is adapted from Flour:Spectacular Recipes from Boston’s Flour Bakery and Cafe by Joanne Chang – I love this book, you should too.

  • 9 cups of rice cereal (generic Rice Krispies are totally fine)
  • 1 bag of marshmallows (I use Jet-Puffed Mini Marchmallows becasue they melt better)
  • 1 cup unsalted butter
  • 1/2 a vanilla bean (optional but it really does make it better)
  • 1/2 tsp coarse kosher salt
  • Lightly grease a 9×13 pan with butter, just to coat. Measure out the rice krispies into a large bowl.
  • Add the butter and the caviar from the vanilla bean (all those seeds inside when you split it) to a medium pot. Melt the butter over medium heat and keep a close eye on it. The butter will go from browned to burnt in about two seconds. Wanna Be a Country Cleaver has a great How To for browned butter over on her blog if you want some pictures and a step-by-step tutorial.
  • Add the marshmallows to the browned butter and stir to combine and melt. This will be a bit sticky and not all of the butter will blend with the marshmallows, that’s ok.
  • Pour the butter/marshmallow/vanilla bean mix over the cereal and stir quickly. The sugars in the marshmallows cool fairly quickly so being well prepared and stirring fast is key here.
  • Press the rice krispy treat mixture into your greased pan. I frequently use a piece of parchment to smooth out the top of my treats without getting my hands messy.
  • Sprinkle your coarse salt on top of the treats. The salt can be added to the cereal if you prefer but I always find that it falls to the bottom of the mixture when that happens.
  • Enjoy with a drizzle of caramel you made for your big sister, because she asked for it and you just couldn’t say no.

Six Layer Salted Caramel and Chocolate Truffle Cream Cake

Thanks for the picture Rachel!

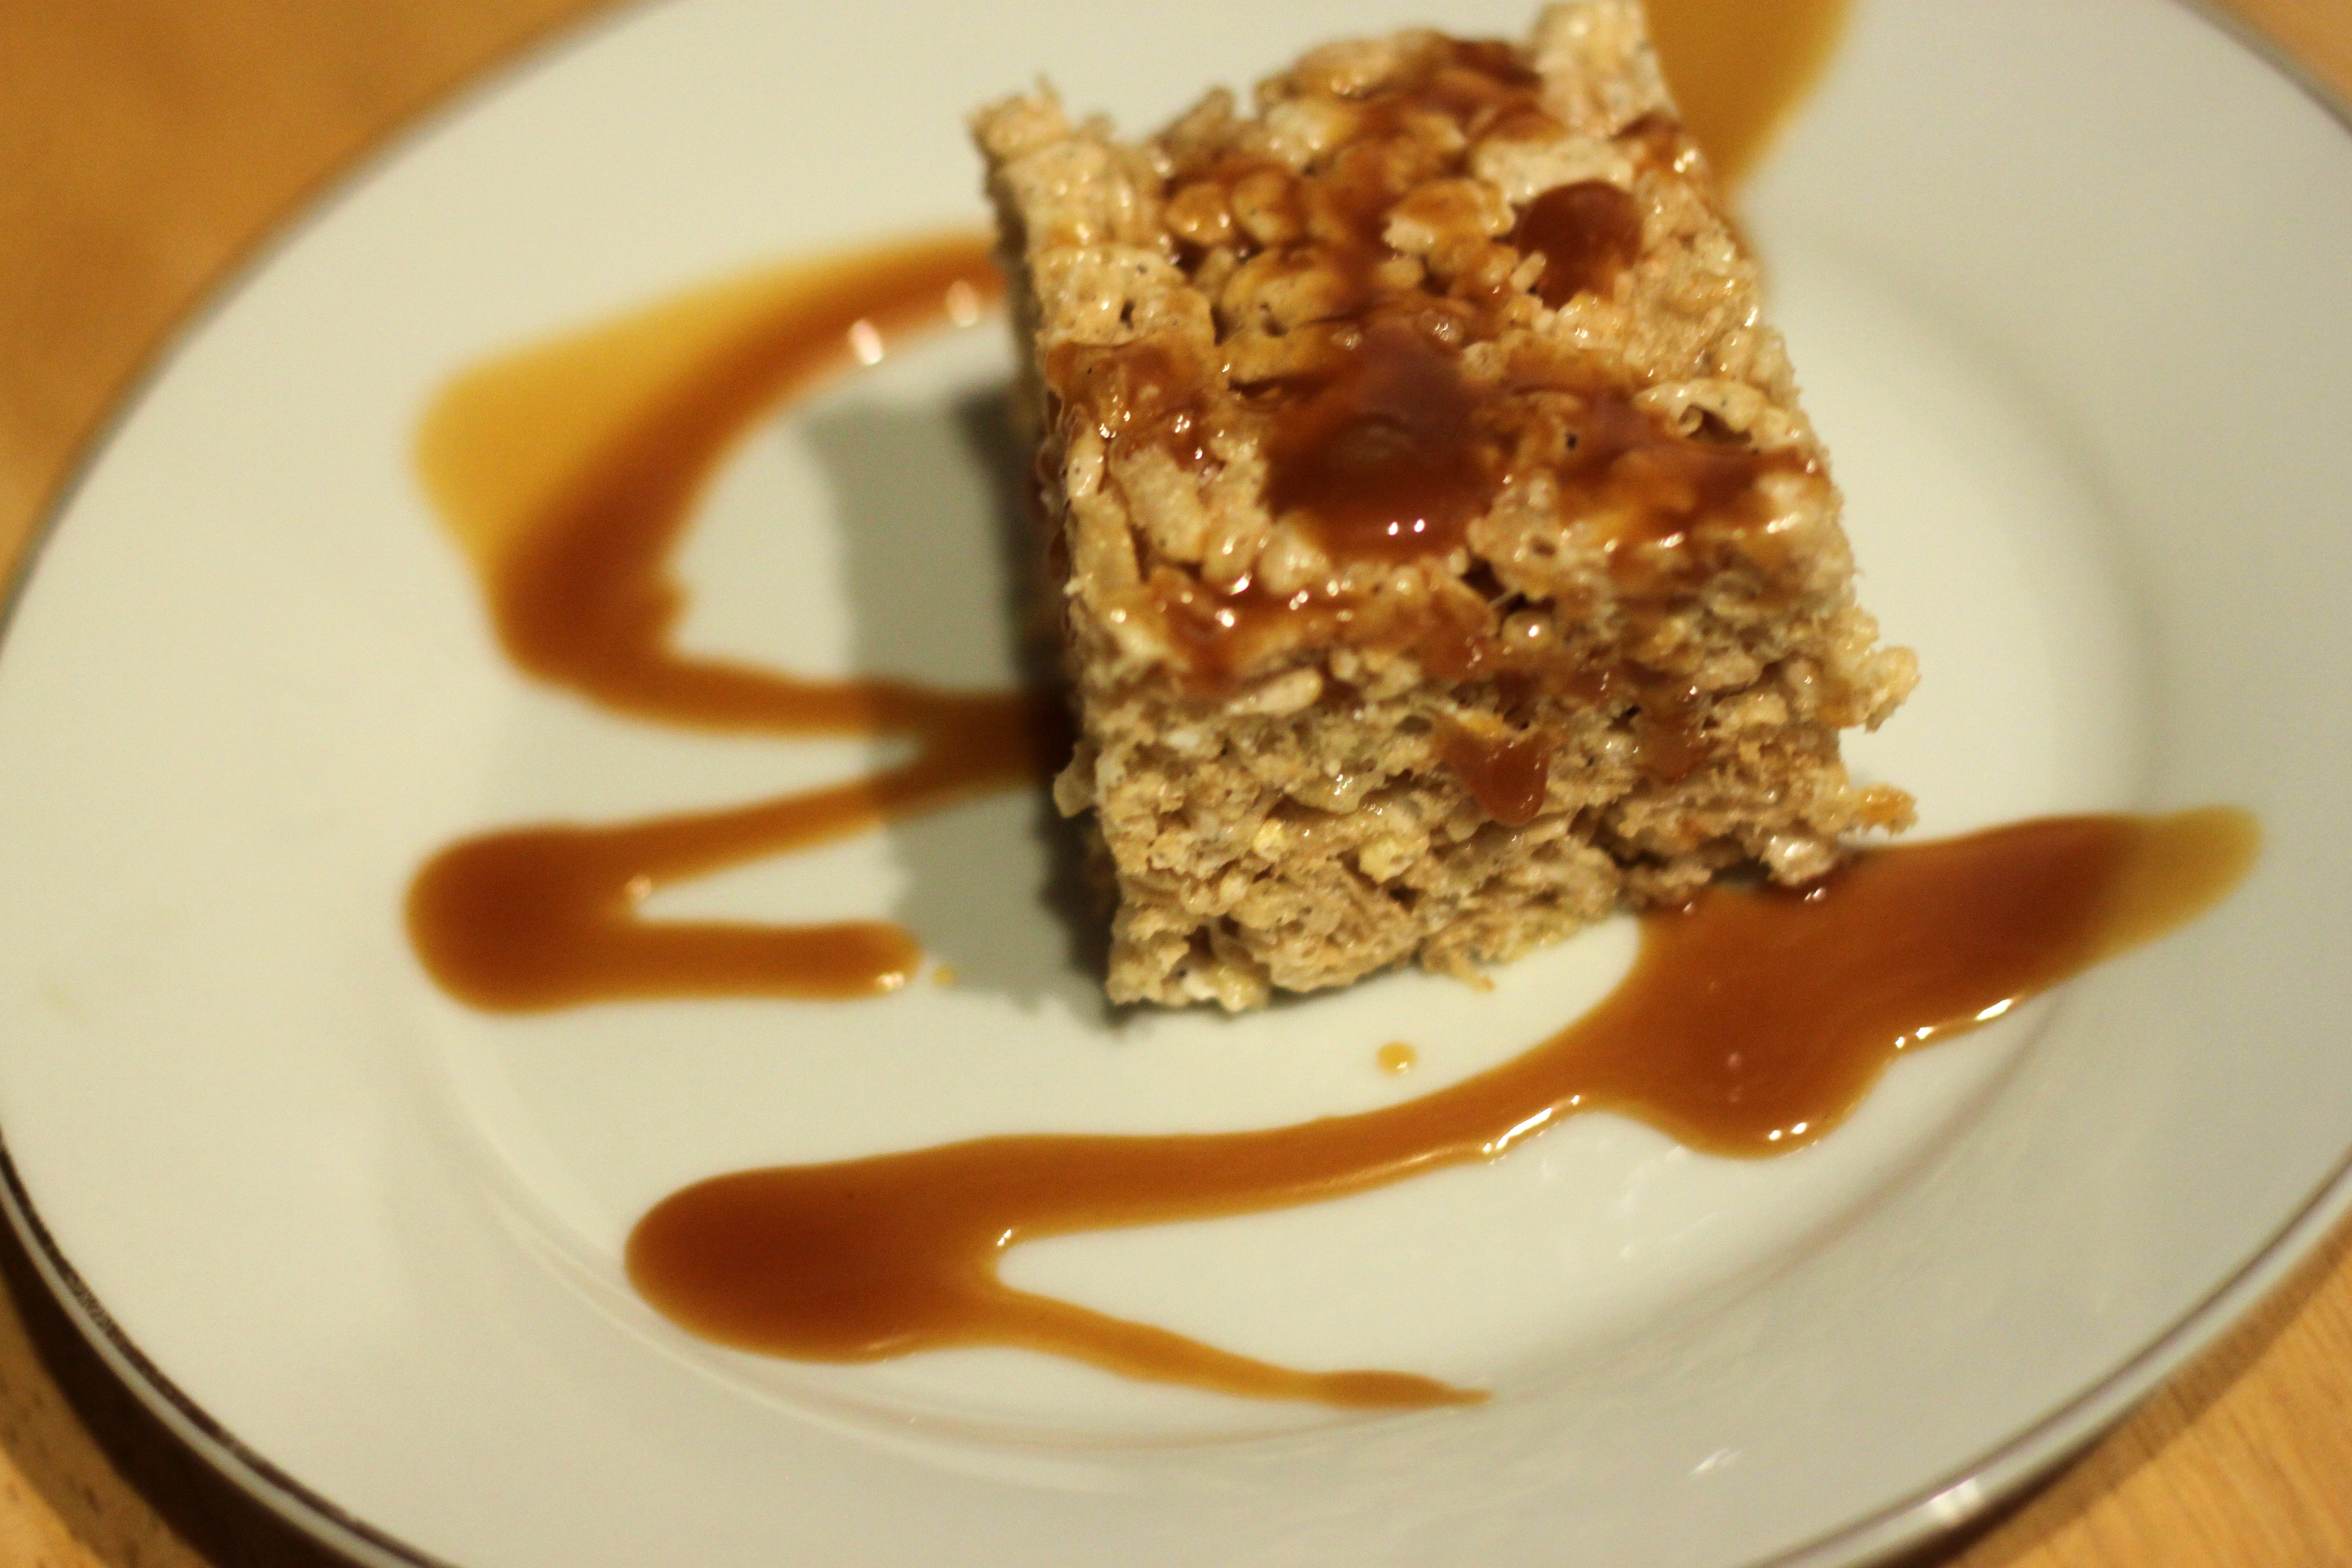
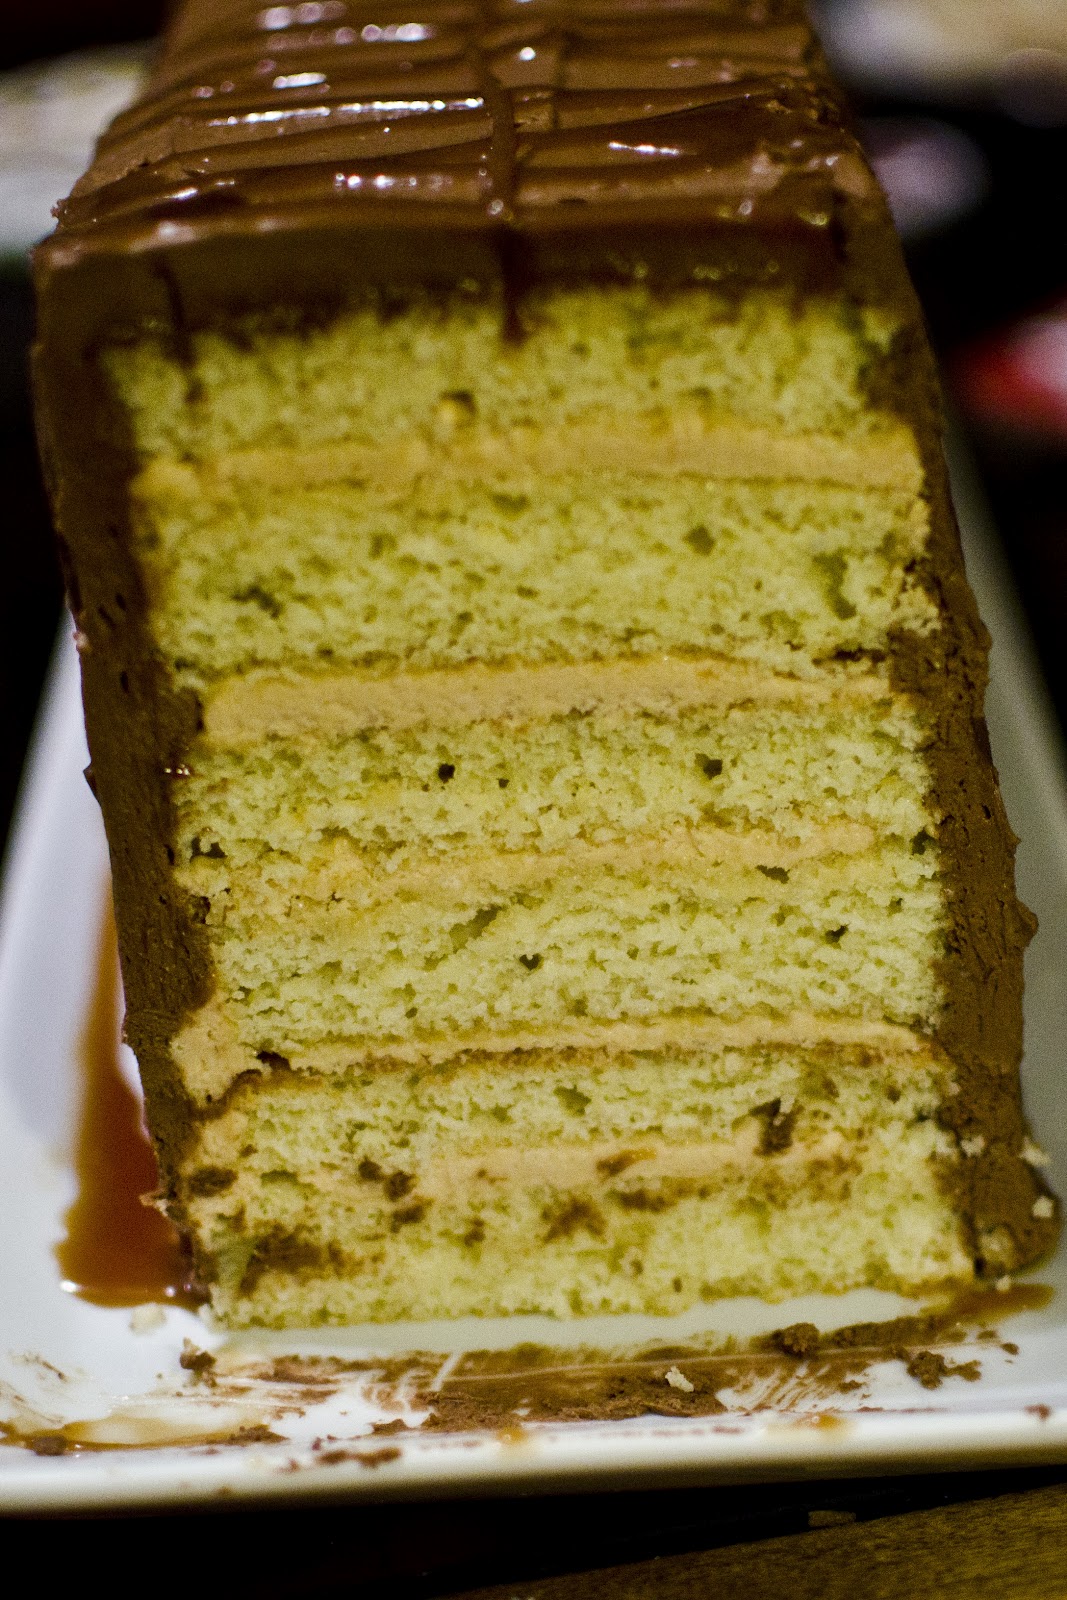
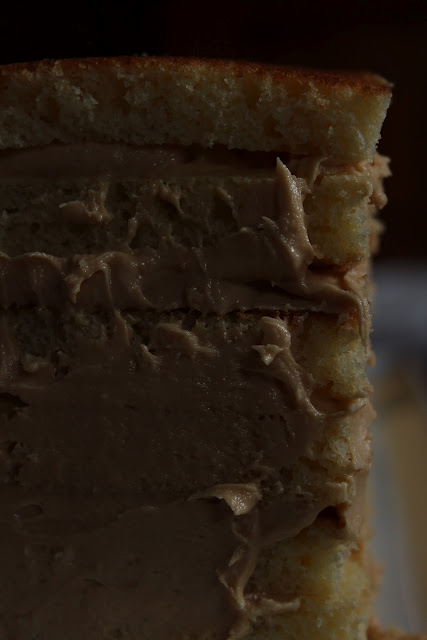
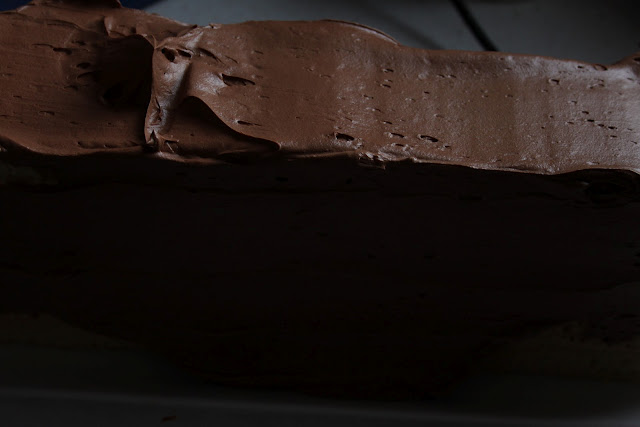
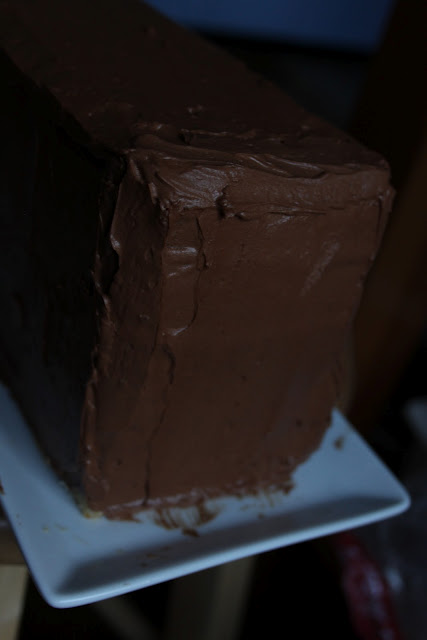
I wasn’t going to post this recipe initially.  The cake recipe is an old one (a favorite that I use all the time) and the salted caramel frosting is directly from another blog – but BF told me I needed to share it because a six layer confection of frosting and cake should be shared.  Because I hadn’t initially meant to blog this there are only pictures of the cake as it was built, but don’t worry about that.  Marvel at the cake – six layers of yellow cake, salted caramel frosting sandwiched between each layer, coated with decadent chocolate truffle cream frosting, and topped with drizzles of caramel sauce.

I had been playing with the idea for this cake for quite a while – it’s a take on Smith Island cake, which just had chocolate frosting and filling.  But BF isn’t the biggest fan of that much chocolate and I’ve been wanting to make salted caramel frosting, so it seemed a natural fit.  I made this cake to bring over to Rachel and Joel’s as a pairing with a fantastic meal of braised lamb shanks and potatoes au gratin.  Which meant I baked all day and left an obscene amount of dishes in the sink.  But it was worth it.

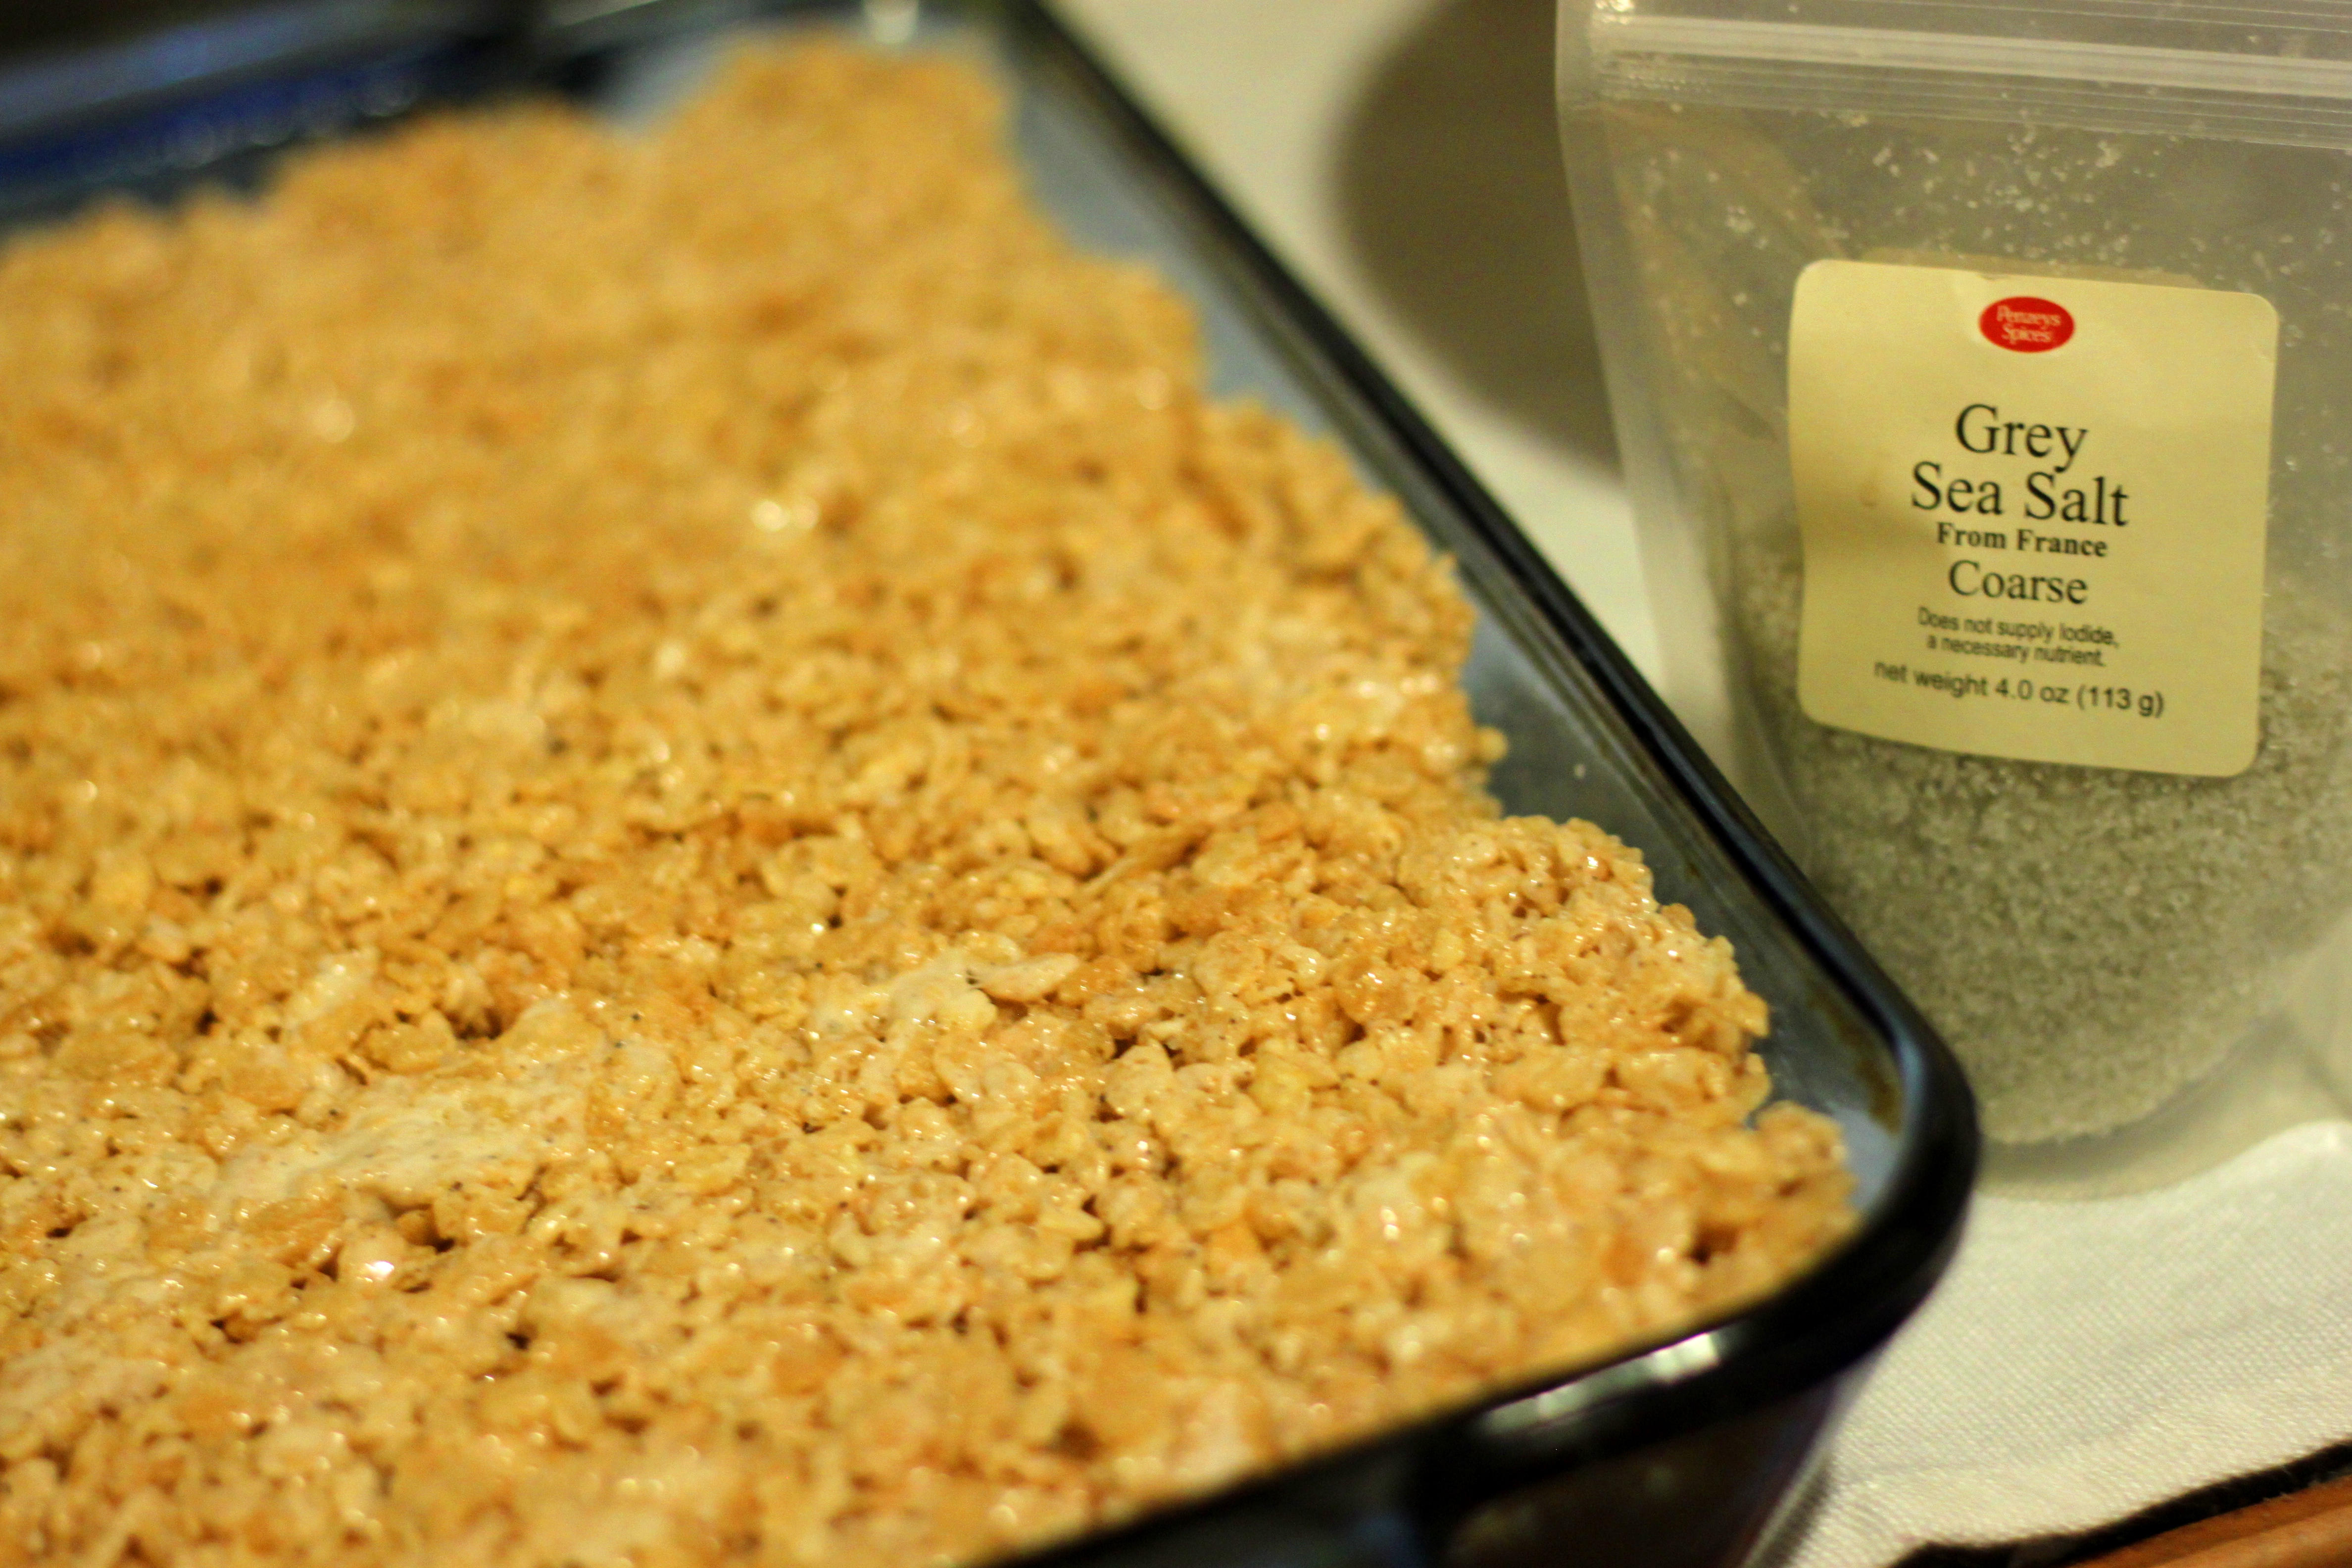
I am one of those people that will bake to soothe whatever stress I’m under, whether it be in relation to job-hunting or doing my taxes, baking calms me down.  So on Saturday, while BF struggled with his taxes and I paced impatiently from the kitchen to the office and back again, I baked a cake, I made two different kinds of frosting, and I fell in love with salted caramel sauce all over again.  As I watched sugar melt and boil to a beautiful amber color and hoped against hope that it would come out right this time I fell into a state of ease – I shook off the tension of the week and indulged in a cake scrap drizzled with caramel sauce.  So perfect, so confidence inducing, so satisfying to see a pot of caramel and say, “yeah, I did that, TWICE.”

Let us not forget the chocolate truffle frosting, either.  This frosting is sort of a mantra for my mom who tells me that it is THE chocolate frosting I must make if I’m looking for it.  My mom found this frosting about nine-and-a-half years ago, while she was pregnant with ‘Tonio and swore she wouldn’t ever make another one.  I tend to agree with her – it’s fantastic, decadent without being too sweet, and rich without being overpowering.  It paired perfectly with the salted caramel frosting.  Now if only we all had enough room to eat a whole 3″x14″ six layer cake, instead we all had thin slices and cursed the epic amount of cake I made.  Oops.

Six Layer Cake with Salted Caramel frosting and Chocolate Truffle Cream Frosting
The cake is all my design!  The cake recipe I used is one I put up here a long time ago.  The salted caramel frosting is from this post, over on My Baking Addiction, I made just the caramel sauce to put on top too.

Chocolate Truffle Cream Frosting
Adapted from the Joy of Cooking
This recipe makes enough to frost and fill a two layer cake.

4 egg yolks
1/4 cup sugar
1 tsp espresso (1 tsp espresso powder + 1 tsp boiling water works)
1/3 cup boiling water
6 oz finely chopped chocolate (about a cup)
8 Tbs unsalted butter

In a wide heat-proof bowl (I use a shallow metal bowl) whisk together the yolks, sugar and espresso until fully combined and frothy, about 30 seconds.  Add the boiling water 1-2 Tbs at a time, whisking between additions, until fully incorporated.  Place a bowl in a frying pan with at least an inch of water in it (the idea here is basically a wide flat double boiler).  Bring the egg, sugar, espresso, water mixture to a temperature of 160 degrees, stirring occasionally, and remove it from the heat.  Add the chocolate and butter, mix until smooth.  If you find that the chocolate/butter aren’t melting you can put them back in the pan with water in it (turned off, the water should still be warm enough to melt chocolate).  Allow the frosting to cool, in the fridge, fro about twenty minutes if you want to use it as a spreadable frosting.  Or just pour it over your cake if you just want a glaze.  Enjoy.

Assembly


This cake was a bit tricky for me, in that I created the whole thing specifically for a platter I had in mind, hence it’s Kit-Kat like appearance.  This meant cooking the cake in cookie sheets/jelly roll pans and then cutting each sheet of cake down to a specific size, in this case 3″x14″.  I found that cutting the cake down to be uniform sizes was the hardest part, mostly because I just can’t cut in a straight line.  Regardless, when all of your cake pieces are uniform (or you think they are) stack them to make sure.  Then you can start the real assembly.  It’s best to have both frostings all ready when assembling, then you don’t have to stop.  Start with a cake on the bottom then add a hefty amount of caramel frosting – I found that one recipe made just enough for me to fill between the layers. Smooth out the frosting then add another layer of cake, continue to alternate until it looks like the “image” below:

Cake
Caramel Frosting
Cake
Caramel Frosting
Cake
Caramel Frosting
Cake
Caramel frosting
Cake
Caramel frosting
Cake
There should be cake on the top and bottom of the whole thing.  After you have filled the cake go around the edges with an offset spatula (if you have one, I used a butter knife).  Then coat the whole cake in chocolate frosting. If you made the above frosting (which I can’t recommend highly enough) then you should have enough for about 1/8inch think frosting over the whole cake.  You should check out Test Kitchen for tips on cake frosting, they’re awesome.  Last of all, top the whole cake with a drizzle of caramel sauce in whatever pattern you want.  Adding this caramel helps tone down the richness of everything else and is an important step, don’t skip it.  Then take this massive cake and share it, with at least ten other friends.  You will want to eat it all by yourself, this is a bad idea.  Also, taking it on a long, packed train/bus ride is not a good idea.  Trust me, I tried it, the cake got, well, smooshed.

Fudgy Brownies with a Swirl

So, here’s the thing.  I love these brownies and I tend to swirl them with whatever I have on hand – Biscoff spread, ooey-gooey caramel, peanut butter, sea-salt flakes – basically anything that will lend itself to chocolate.  I am partial to the swirl of Biscoff spread – it’s a little bit cinnamony and a whole lot of tasty that makes the chocolate much less decadent and totally sinful.  I found these brownies before I even started blogging and immediately made them to BF’s groans of general brownie dislike.

The crux of a good brownie, I have taken to thinking, is that it must contain some sort of balance and MUST MUST MUST have mad quantities of butter inside.  They should also be an soft brownie, one specifically designed to be fudgy and dense – but still fully cooked.  These are that magical brownie that falls between overly rich and heavy and cake.  They are moist and addictive.

That first batch of brownies was plain, with a sprinkle of Maldon flaky sea salt.  Brownie batch number 2 was a swirl of peanut butter and a sprinkle of sea salt.  Batch number 3 was a swirl of Biscoff and batch number 4 had a caramel swirl.  All of the brownies had their pros and cons – salty lovely caramel, creamy lush Biscoff, peanut butter, and the simplicity of a well chosen salt.  These would probably also lend themselves to a swirl of Nutella if that’s your thing.

Regardless, you should probably make these brownies, for yourself or just to give to a friend who needs some cheering – as long as they like chocolate!

Fudgy Brownies with a Swirl
Adapted from Bake or Break (I think, this recipe has been floating around my apt for a while).  I have modified the recipe so use more unsweetened baking chocolate (because I have an excess) and I cook mine a little more than she suggests.  I have added directions to swirl ingredients in but I will leave it up to your discretion as to what that swirl you choose, if any.

10 Tbs unsalted butter
3 ounces unsweetened chocolate
1/4 cup unsweetened cocoa powder (dutch processed will be richest)
2 cups granulated sugar
3 large eggs
1 1/2 tsp vanilla
1 cup all purpose flour
1/4 cup peanut butter, biscoff spread, caramel sauce, dulce de leche (whatever)
1/2 tsp sea-salt

Preheat an oven to 350  degrees.  Grease and flour a 9″ round or square pan, if you want to get really fancy you can line it with parchment paper (a tutorial can be found here).  In a small-ish (microwave-safe) bowl, or in a double boiler, melt the unsweetened chocolate and butter together until well blended, about 45 seconds in the microwave stirring every 15 secs or so.  Allow the chocolate/butter mixture to cool slightly.  One at a time add cocoa powder, sugar, eggs, vanilla, and flour – making sure to fully incorporate each ingredient before moving to the next.  Pour the batter in to the prepared pan.  If you are adding a swirl to your brownies you will do that now, drop tablespoonfuls of your swirl (Peanut butter, biscoff etc) into the pan strategically and gently swirl them in with a knife making sure to not get too close to the edges of the pan or scrape the bottom.      Sprinkle the salt onto the top of the swirled batter.  Bake for 30-40 mins, until the edges are set and the middle is set (but not necessarily firm), at this point a toothpick inserted into the center will come out with a bit of batter (though it shouldn’t be much).  Cool the brownies at room temp for 20-30 mins, I like these brownies when they’re warm from the oven but if you want it less gooey stick it in the fridge.  The brownies will still be rich, but less messy.  These go fast, especially if you like brownies.