Fresh Blueberry Pie

I love August.  I love the cicadas calling in the high grass and the smell of blueberries ripening on the air.  I love swimming in the afternoons and trying to get the purple out from under your fingernails after a long day of raking. And I love the blueberries.  There is something so intensely satisfying in picking a sun warmed blueberry and popping it in your mouth with that tartness on your tongue.  It’s also a very short window this heaven of blueberries in Washington County Maine (it’s one of the best parts of the whole year there… long hot days and blueberries for as far as you can run along 1A).

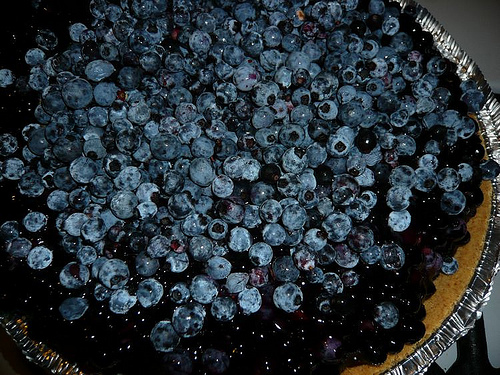
This year the blueberries are not cooperating – they’re super early (like when I was little raking started last week and the season ran for two weeks)and at this point have completely gone by.  I went home last week and in a panic of not getting blueberries for my year demanded my mom help me out – she did because she loves me and raked about 20 pounds of blueberries for my big sister and I to split when I got home.  I of course got home and promptly came down with a cold that put my out of commission for two days, and my blueberries sat in the fridge wiating for me to feel better.  On Thursday I did feel better.  With that good health came THIS PIE.  This pie is my ode to perfect fresh pie.  As a late night snack or breakfast it is delicious – the tartness of the berries makes it a not-too-sweet dip into the delightfulness that is this pie.  Top it with sweetened slightly whipped cream and its “practically-perfect-in-every-way.”

With August running hot and humid everywhere this is cooling in all the right ways, not to mention picking the berries on the right piece of land makes you feel as though you should live in the country slowly getting sunburned while berries pop off of their stems forever, though I may be a bit partial. 

Fresh Berry Pie a la Mom
Note: This pie can go in a crust or just in a bowl topped by whipped cream, it’s delicious either way.  Either way its a “day-of” kind of pie.  You can use frozen berries to create the glaze, thus preserving your fresh if you like.

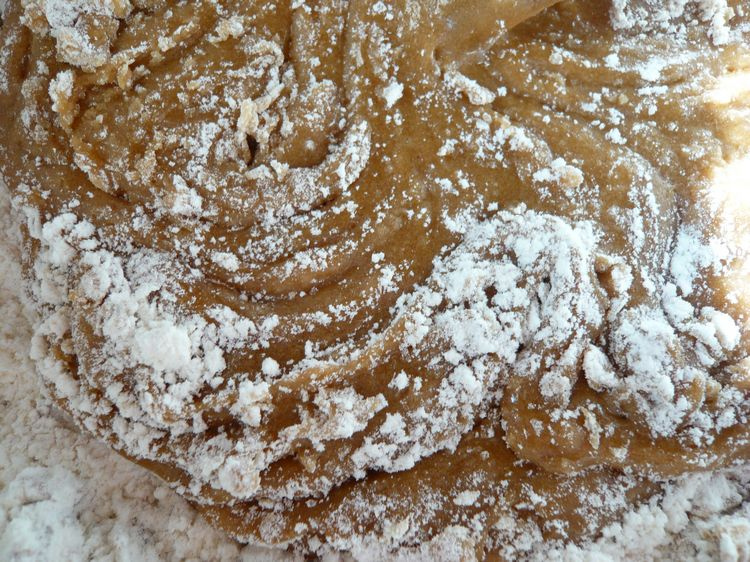
For the Crust – Buy it.  Brush it with egg white and bake at 350 for 10-15 mins until its golden.   Let it cool completely.

For the Pie
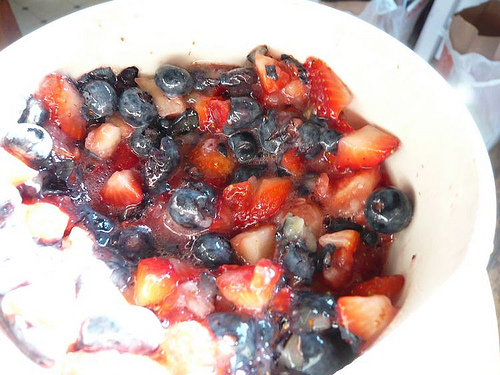
2 Qts fresh berries (any kind though I like blueberry) cut to bite sized pieces, washed and picked over, 3/4 cup reserved
1 cup Sugar
1 cup water
1/2 tsp Ground Nutmeg (optional)
1/2 tsp Cinnamon (optional)
3 Tbs Cornstarch (shaken with 1/4 cup water)
1/2 Lemon, juiced (about 1 Tbs)

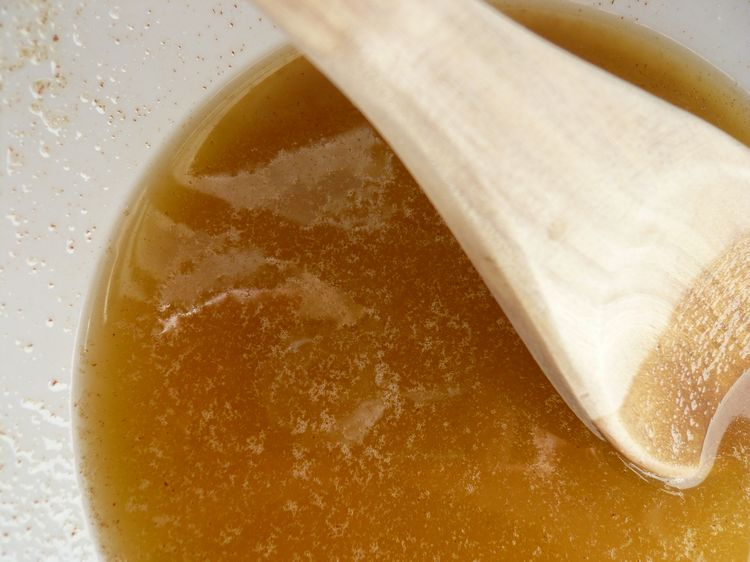
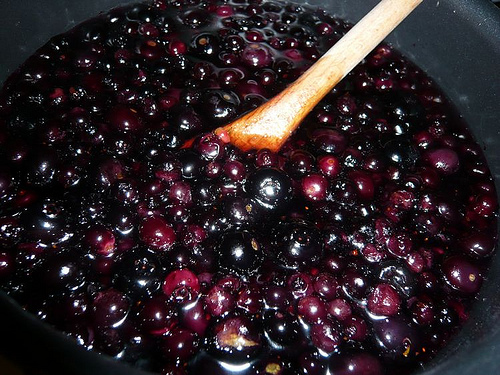
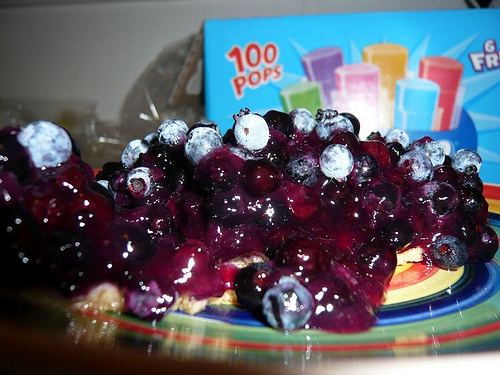
Add water, sugar and 1 cup of the berries to a medium saucepan and bring to a boil.  Once the water/sugar/berries/nutmeg/cinnamon have come to a boil add the cornstarch/water to it.  Continue to simmer that sauce for 5 minutes until it is clear and think (this is a great fruit glaze in general).  Remove the sauce from the heat and stir in the lemon juice.  In a large bowl gently fold the sauce into the fresh berries, evenly coating them.  Drop this pie filling into your pre-baked crust and smooth it out until it’s even, it will slightly overfill an 8″ crust and come to the top of a 9″.  Top the filled pie with the reserved berries and refrigerate for 2-3 hours – I suggest taking this opportunity to locate more berries for your second pie.  Serve with a generous dallop of very slightly whipped cream. DELICIOUS.  Enjoy.

Custard Ice Cream with Mixed Berries

So… Failure in the kitchen makes me horrifically sad.  I nearly start to cry and Boyfriend always has to steal whatever I have deemed unacceptable away from me so I don’t throw it out in a fit of anger.  Most of the time these failures can be attributed to one of two things 1) I got sloppy and missed a step or 2) I was hurrying and just didn’t wait properly.  This failure falls into the didn’t wait category.

When I got home from work and saw that I had missed a UPS package I immediately called them and asked the UPS office to hold it, in the distribution center down the street for pick-up the next day.  Then I googled ice cream recipes for 10 hours, custard, sorbets, fro-yos, sorbettos, gelatos, you name it I was obsessively searching for it on google as a break in for my new Ice Cream Maker attachment for the KitchenAid (otherwise known as Esther).  I found four to try and printed them out for later and trekked home in a downpour.  Did you know there are 3 UPS buildings in a 1 block radius in Watertown?  Neither did I.   I had to go to all of them before finding my ice cream maker and heading home with it to freeze.

Now: Day 2 Ice Cream Maker is frozen and I can’t find the Ice cream recipes I so carefully weeded through – ANYWHERE.  They’re gone the way of the cooler temperatures so I’ll use the one from the KitchenAid book that came with it, it can’t be that bad right?  And you know in all fairness to the KitchenAid people – it probably wasn’t, the custard base tasted fine and the berries were delicious (like a big kid slushpuppy glazed in Chambord).  But I couldn’t wait and poured the STILL STEAMING custard into the nicely frozen ice cream maker.  Failure.  SO.MUCH.FAILURE.  I turned it on and went to watch 30Rock, nothing happened but some sweat peeing onto the counter.  Sadness.

The next morning it was full of shard of ice – like it had melted and refrozen all wrong.  The worst experience ever with ice cream.  Maybe take two will be better?  Keep your fingers crossed for me because those stillettos of ice were just not pleasant melting in my mouth.  Not at all.

Custard Ice Cream with Mixed Berries
Note: I’m sure with patience I can actually make this ice cream.  Now if I only knew where I had put that down.

Mixed Berry Mash
2 cups mixed berries, I used raspberries, blueberries, and strawberries
2 Tbs of your favorite liquor or brandy (I used Chambord and it tasted EXACTLY like a blue slush puppy)

Mix the berries together in a bowl with the liquor and mash them a bit with a masher so they’re all about he same size and some of the juice has been a little pressed out.

Custard Ice Cream Base
2 1/2 cups half and half
8 Egg Yolks
1 cup sugar (I used 2/3 cup)
2 1/2 cups whipping cream
4 tsp Vanilla
1/8 tsp salt

In a saucepan heat the half and half to just bubbling – stirring often to keep it from scalding.
Mix the sugar and egg yolks together in a medium bowl stirring until they’re thick and ribbony, about 2 minutes of mixing by hand.  Mix in the half and half to the eggs and sugar slowly while continuing to stir to keep the eggs from scrambling.  Stir the whole thing until it has set and is a light yellow color.  Return the egg, sugar, and half and half mixture to the pan and bring to a second simmer stirring constantly until it starts to lightly bubble on the edges – DO NOT BOIL IT. Put the hot custard base back into your mixing bowl and gently stir in the vanilla, salt and cream.  Cover and do what I was too impatient to do and CHILL IT.  Watch a movie, have a nap, go to bed then make breakfast.  AFTER cooling put the chilled custard in the bowl of your ice cream maker and follow the instructions.  Add the mixed berries at the very very end just in the last two or three twirls of the ice cream maker.  And there it is.  I hope you have better luck than I did.

Brown Sugar Sugar Cookies

I like it when friends have birthdays, there are parties and there are excuses to bake.  We’re not talking about simple things like chocolate chip cookies either, but the things that you save for special occasions – ganache filled cupcakes and hand dipped chocolates, cookies that require the maker to first brown then strain the butter before even adding other ingredients. These cookies are like that, complicted, delicious, and for a birthday.

The first time I made these I vowed to NEVER MAKE THEM AGAIN not because they were too much work, but because they didn’t leave the kitchen.  I barely got them out of the oven when my boyfriend grabbed one off the cooling rack yelling, “Hot hot!,” and ate it with a taunting grin.  I know I should be greatful he realized they were hot, mostly I was irritated that I barely got one before they disappeared.  But the one was a magical cookie, deep rich caramel tones that were fluffy and didn’t even threaten to pull out my million-and-one fillings – I’ll take two please (or would have if there had been two to have).

So here I was asking said friend what she wanted for her birthday and she asked for these, of all things.  I tried to dissuade her, “Are you sure you don’t want gingersnaps?” I wheedled.  She was steadfast and I was stuck covertly making delicious, decadent cookies hoping my TF2-playing-boyfriend didn’t notice the kitchen bustle.  He did.  I lost two cookies before I was able to seal them in a Ziploc bag marked “FOR NIKKI DO NOT TOUCH” (admittedly he did get a consolation prize of coconut macaroons, which were fine but nothing to write home (or here) about).

So without further ado, caramelly, rich, crackly infinitly amazing Brown Sugar Sugar cookies.

Brown Sugar Sugar Cookies
Adapted, very slightly, from Cook’s Illustrated

Note: These cookies can be frozen, premade, for later usage and eating (but I would strongly recommend a double batch in that case)

Ingredients
14 Tbs unsalted butter (I use half Salted hlaf unsalted but it doesn’t really matter)
2 Cups packed Dark Brown Sugar
2 Cups plus 2 Tbs All Purpose flour
1/2 tsp Baking soda
1/4 tsp Baking Powder
1/4 tsp Salt (use a little more if you are using all unsalted butter)
1 large egg
1 large egg yolk
1 Tbs Vanilla (it really is neccessary, DON’T SKIMP HERE)
1/4 cup granulated raw sugar (i prefer the raw but don’t go get it especially regular granulated works fine)

Heat 10 Tbs of the butter in a light bottomed sauce pan over medium until melted and nutty brown, it will smell rich and there will be some solids in the bottom, stir the butter nearly constantly and watch it like a hawk or IT WILL BURN (and that is sad).  Transfer the melted butter to a large mixing bowl and add the rest of the butter to melt.  Let the melted butter mixture cool to room temperture, this should take 10-15 mins.

Place oven rack in the middle position and line cookie sheets with parchment paper.  Mix the raw sugar and the brown sugar together in a small bowl (bowl 2) until even and set it aside, you will use this later to dip the rolled cookies in.

Sift the flour, baking soda, baking powder and salt together into another bowl ( I know bowl 3 is a little confusing try to keep up) and set it aside.

Add the remaining 1 3/4 cups of Brown sugar to the melted, delicious, butter and stir it until there are no lumps 30-45 seconds, it will be a very dark and molasses-y looking mixture -that is OK.  Scrape down the sides of the bowl and add the egg, egg yolk, and vanilla mix it all until fluffy-ish and incorporated, another 30-45 seconds.  Side note: recipes alwasy say “mix until fluffy” when they really mean mix it until eveything is incorporated and it looks a little mor opaque than before, because lets face it – you’re not making whipped cream here. Add the flour mixture (from bowl 3) to the liquids (bowl 1) and mix until just combined ~1min.  This mixture will be a little stiff, that is okay – brown sugar and butter will do that.  Give the dough one final stir and scrape the bowl to check for even distribution.

Scoop out the dough in 11/2 to 2 Tbs balls (really don’t try to make these smaller they’re better as a chewy cookie) and roll in in the sugar mixture to coat evenly.  Stick the doughballs on cookie sheets 2-3 inches apart and cook them fro 12-14 minutes.  The cookies will begin to crack on the tops and look a little raw, they’re not.  Also if your cookie is getting dark on the edges its been in there too long and you should maybe eat that one as a tester… you know for the sake of the cookies.

Cool the cookies for 5-10 mins on a rack and hide them a… wait that wasn’t what I meant. 

ENJOY!

Red Velvet Cupcakes with Luscious Cream Cheese Frosting

So I was on my way to dinner at a friend’s house and bringing dessert one Thursday, now this sounds easy but when you have the shelf of cookbooks that I have you start to panic, sweat dripping hands shaking panic, what to choose to make a wow impression. So many choices, do I go with classic never-fail-chocolate chip cookies or do I instead try the ultrachic never tried hazelnut chocolate tart (which I don’t even have a pan for)? Obviously, I went for some middle ground cake which was a familiar and easy to adapt thing but something I had never tried yet to make, the Red-Velvet variety.

This cake was finicky and at times over-complex, but its complexity has made it increasingly more delightful to my remembrances. This was a cake recipe that SassyRadish tried to very happy campers (mainly an adorable 4-year-old she had photographed eating the cupcake with a HUGE smile). I showed up to my friend’s apartment with 12 of these cupcakes in a records box (I work a full time records management job) and she was enchanted. They were a little richer that I would like, maybe a little lighter on the zest next time and the frosting was decadent and delicious, the boyfriend and I were eating it by the spoonful instead of getting it on the cupcakes, which to be fair was just as reasonable as using it to frost anything, because let’s face it give me cream cheese in anything and I’ll eat it. Yup. I’m a sucker for that deliciousness. But just for fun, here’s the cake!


Red-Velvet Cake with Orange Zest and Cream Cheese Frosting!
Tweaked slightly from SassyRadish
Note: This makes 18 cupcakes, which I got in the form of 12 “Perfect-Prom-Queen Cupcakes” and 6 “Deformed-Cupcake-Cousins”

The Cake!
2 ½ cups sifted All Purpose Flour, plus some to grease and flour the pans
2 tsp salt
2 tsp Baking Powder
¼ tsp Baking Soda
¼ cup Cocoa Powder
2 Tbsp Liquid Red Food Coloring (or ¾ Tbsp or gel coloring and 1 ¼ Tbs Water)
1 ½ Tbsp Water
1 Cup unsalted butter, softened to room temp (70 degrees)
2 Cups Sugar
3 Large Eggs
1 ½ tsp Natural Vanilla Extract
1 ½ tsp Orange Zest (I used a Blood Orange and it was quite strong, the zest can also be entirely left out if you are not of the fruity baked goods type)
1 Cup Buttermilk

The Frosting!

¾ Cup (1 ½ sticks) unsalted butter
½ Tsp Natural Vanilla Extract
1 Pound Cream Cheese (2 Packages) Softened
2 Cups Confectioner’s Sugar (use more if you like sweeter frosting)
2 Tbsp Milk, if it is too thick

1. Preheat the oven to 350 degrees and butter/flour/line a cupcake tin.

2. Sift together the dry ingredients (flour, salt, Baking Powder, Baking Soda). Twice.

3. In a small (dark) bowl mix together the cocoa powder, red food coloring and water until it becomes a smooth paste. This will dye anything you are wearing/making it in/stirring with/your fingers, so be careful and aware of this!

4. In a large mixing bowl beat the butter until smooth (30 seconds or so depending on butter softness) then gradually add the sugar ¼ cup at a time scraping down the bowl between additions. After the final addition of sugar beat this mixture until it is light and fluffy (2-3 minutes). Add the eggs one by one following the same process as before, add/mix/scrape/add. After the eggs add the vanilla and then orange zest beating until mixed evenly with both (15 seconds or so). Add the red cocoa paste and mix it in until everything is an even color (it should look quite red at this point).

5. Add the flour mixture to the butter/sugar/eggs in thirds alternating it with the buttermilk and scraping the bowl each time. This is easier to do by hand with a rubber scraper. Make sure to not over mix your batter, over mixed batter leads to flour where gluten tightens and cake becomes too firm (i. e. gross). Once the buttermilk/dry ingredients have been added to the batter give the whole mixture 3-5 good stirs to ensure even incorporation.

6. Distribute the batter into the cupcake pan until the liners are 2/3 to 3/4 of the way full. Bake the cupcakes until a cake tester (toothpick) inserted come out clean, 18-20 minutes.

7. After pulling the cupcakes from the oven let them cool in the pan for 10 minutes (until you can handle them) then transfer them to a cooling rack.

The Frosting!

1. In a large bowl beat the butter, vanilla, and cream cheese until light and fluffy (1-2 minutes). Add the confectioner’s sugar ½ cup at a time until your frosting has reached the desired sweetness (I recommend no more than 3 cups of sugar). If you think the frosting is too stiff to manipulate add the milk to loosen it up.

Frost all the cooled cupcakes and serve on platter, with napkins!

These cupcakes should store for one day at room temperature and a couple of days in the fridge (they were gone before they became old enough to set up an accurate timeline!).